Kubernetes
Kubernetes(K8s) is an open-source system for automating deployment, scaling, and management of containerized applications.
IntoVPS makes is easy for you to deploy, manage and scale Kubernetes clusters on the IntoVPS Openstack Cloud.
In this page, you can find an explanation of how to create new Kubernetes Cluster and other Kubernetes Cluster management actions.
Deploy Cluster

On the main Navigation Panel go to Cloud, choose Clusters and click the floating button + present in the lower right corner
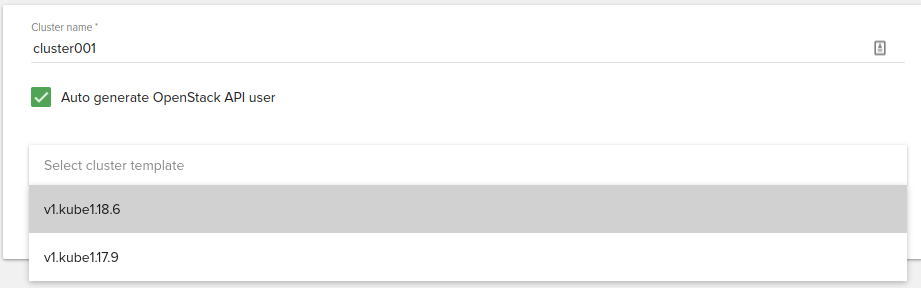
Cluster name
Name of the cluster to create
Openstack API user
We automatically create an Openstack API user based on client id and cluster name. This username is used by Openstack to operate the cluster using CLI tools, e.g openstack client.
Additionally, a username can be selected if you prefer to have a different username by creating first the api user from API Users Fleio menu.
Cluster template
Version of the Kubernetes an user wants to deploy.
In IntoVPS cloud we define the template as following:
- v1: instances will be booted from volume
- kube: cluster type currently we only support Kubernetes
- 1.19.4: version of Kubernetes
Template default options:
- floating ip disabled: default we want our clients to deploy secure clusters which means that Kubernetes apis are not available from internet. In future versions of Fleio we will support deploying public clusters from the same template, currently this options is only available through CLI.
- network driver: calico is the recommended driver for production
- docker storage driver: overlay2 is the only supported driver for our operating system
- operating system: Fedora CoreOS 32
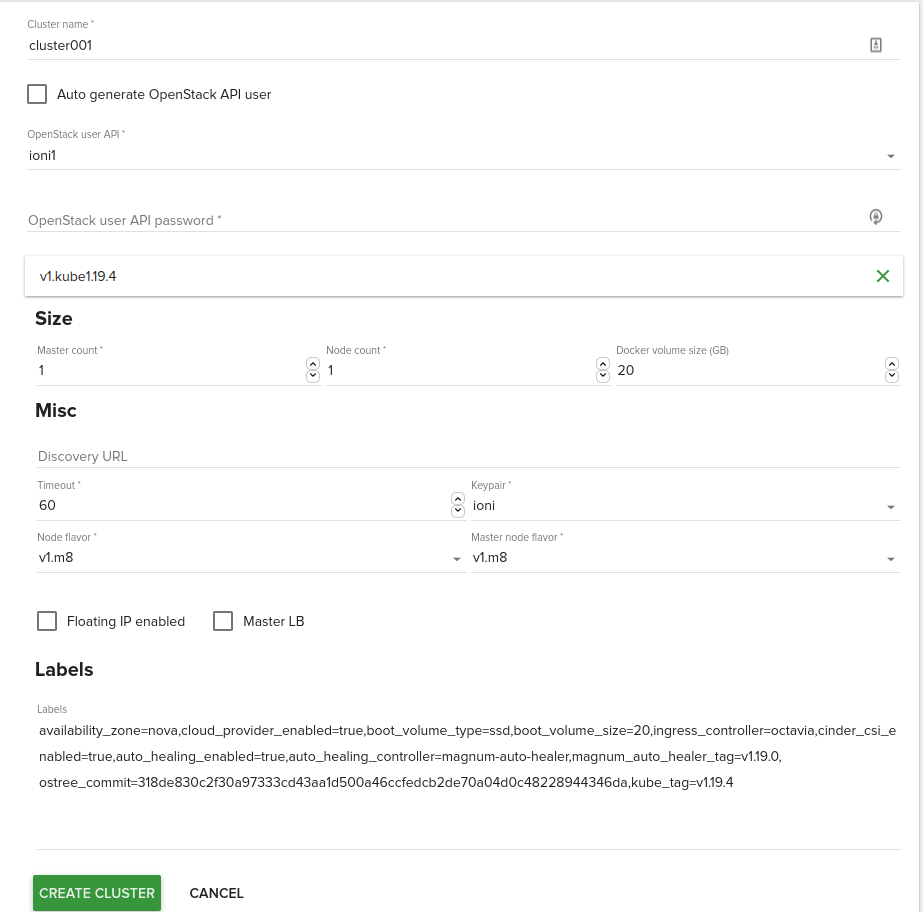
Size
- Master count: The number of servers that will serve as master for the cluster. The default is 1. Set to more than 1 master to enable High Availability.
- Node count: The number of servers that will serve as node in the cluster. The default is 1. Set up more than 1 if you want to deploy more nodes.
- Docker volume size: Default is 20GB. If specified, container images will be stored in a cinder volume of the specified size in GB. Each cluster node will have a volume attached of the above size. If not specified, images will be stored in the compute instance’s local disk.
- Floating ip enabled: If you want to have your cluster deployed as public(kubernetes api is from internet ), each server from your cluster has one floating ip assigned to it.
- Master LB: If multiple masters are configured, you will need to enable master loadbalancer.
Misc
- Discovery URL: The custom discovery url for node discovery.If the discovery-url is not specified, Magnum will use the public discovery service at:
https://discovery.etcd.io - Timeout: The timeout for cluster creation in minutes. The default is 60.
- Keypair: The name of the SSH keypair to configure in the cluster servers for ssh access. You will need the key to be able to ssh to the servers in the cluster.
Note: Please add your key in Fleio using SSH-keys menu.
- Node flavor: The nova flavor for booting the node servers. The default is v1.m8 .
- Master node flavor: The nova flavor id for booting the master or manager servers. The default is v1.m8.
Labels
- availability_zone: nova. The availability zone where the cluster nodes should be deployed, currently in IntoVPS cloud we only support one zone nova
- cinder_csi_enable: true. Enable out-of-tree Cinder CSI driver will be enabled.
- ingress_controller: octavia. The octavia-ingress-controller creates a single load balancer for multiple NodePort type services in an Ingress. If you like to use other controller, traefik and nginx is also supported.
- cloud_provider_enable: true. Enable integration with Openstack. We want enabled if we want Kubernetes to have volume and loadbalancer integration with Openstack.
- kube_tag: hyperkube tag. Currently Magnum uses hyperkube to deploy kubernetes components but sadly, we only support tags that we push ourself on GitHub. For more versions, please email our support staff.
- boot_volume_size: 20G. Since we are using v1 flavors (booted from volume) this label specify the size of the root disk.
- boot_volume_type: ssd. Volume type, defaults to ssd storage(fast). Use hdd if you don't need fast storage for instances.
- master_lb_floating_ip_enabled: The default value depends on the options specified in cluster create. For example, if you have multiple masters and select floating ip then a floating ip will be assigned to the master loadbalancer. Additionally, if you prefer to have a private cluster and only expose the api, enable master lb and set up master_lb_floating_ip_enabled=True.
- auto_healing_enabled: True. By default we enable auto healing for clusters deployed in our cloud
- auto_healing_controller: magnum-auto-healer. We currently deployed magnum-auto-healer controller because it's the only controller that supports updating the health status into Magnum. Currently draino and magnum-auto-healer are supported. For more details, see draino doc and magnum-auto-healer doc.
- ostree_commit: Fedora CoreOS supports a more gradeful operating system upgrade. This is a commit ID of ostree the current system should be upgraded to
- admission_control_list: This label corresponds to Kubernetes parameter for the API server
--admission-control. For more details, refer to the Admission Controllers. The default value is:NodeRestriction, PodSecurityPolicy, NamespaceLifecycle, LimitRanger, ServiceAccount, ResourceQuota, TaintNodesByCondition, Priority, DefaultTolerationSeconds, DefaultStorageClass, StorageObjectInUseProtection, PersistentVolumeClaimResize, MutatingAdmissionWebhook, ValidatingAdmissionWebhook, RuntimeClass
For more labels, please take a look at Magnum documentation
During deploying Magnum creates a private network and subnet used only by the cluster, along side with a router for providing internet for master and minion instances.
Cluster details
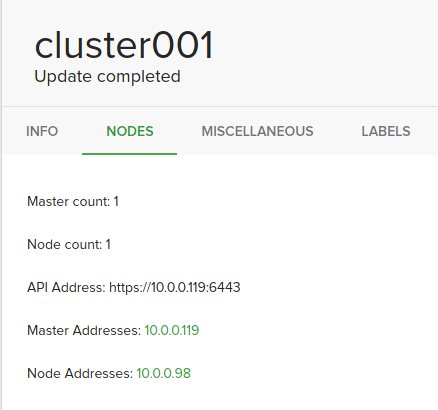
The most important information from cluster details is the master address. We will use it to operate the cluster using kubectl.
- Master count: number of master nodes
- Node count: number of minions nodes
- Api Address: Url of the kubernetes api
- Master Address: Ip of master nodes
- Node Address: Ips of all minions nodes
- Health status: Health status of the cluster.
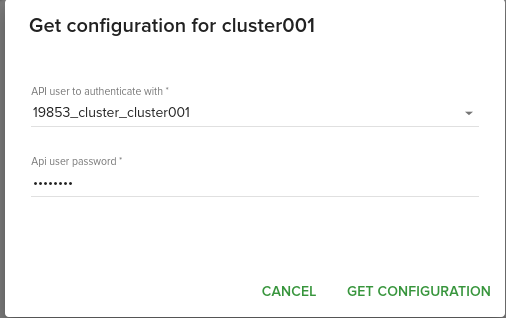
Generate kubectl config
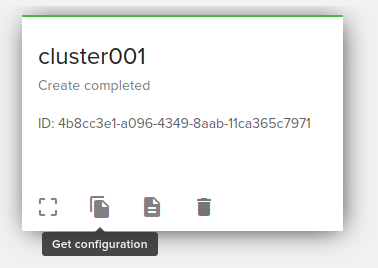
Configuration is generated automatically by the panel by clicking on Get configuration button. If during cluster deploying, auto generate api user was used, you will need to reset user password from API Users menu
The Kubernetes command-line tool, kubectl, allows you to run commands against Kubernetes clusters. You can use kubectl to deploy applications, inspect and manage cluster resources, and view logs. Using the following link for find out how to install kubectl
$ export KUBECONFIG="/full/path/to/config"
Accessing a private cluster
Since Kubernetes API is not available over internet, we will need to deploy an additional server(bastion) that gets access into the private network.
To create a new instance click the plus (+) button from the bottom-right - Create Instance
- Instance name: bastion-cluster001
- Select region Cluj
- Select a configuration: v1.m2
- Boot source, Ubuntu 20.04 with a minimal storage volume of 20G
- Select ssh key
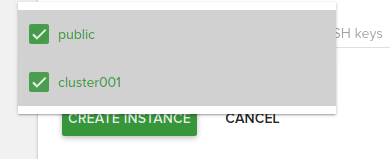
- Network selection, select both public and private network(usually the name is the cluster name)
There is two ways we can operate the cluster:
- we ssh into the instance using the public ip assigned, we install kubectl as described and copy the configuration from the above section
- we setup a ssh tunnel to the instance using the public ip and we use our workstation to operate de cluster as following. In our case, the master url api is available at 10.0.0.119
$ ssh -f -L 6443:10.0.0.119:6443 root@185.250.105.x -N
server: https://10.0.0.119:6443
server: https://127.0.0.1:6443
Installing kubectl
Download the latest release with the command:
$ curl -LO "https://storage.googleapis.com/kubernetes-release/release/$(curl -s https://storage.googleapis.com/kubernetes-release/release/stable.txt)/bin/linux/amd64/kubectl"
Make the kubectl binary executable and move it into your PATH.
chmod +x ./kubectl
sudo mv ./kubectl /usr/local/bin/kubectl
If you prefer an alternative installation method using native packages please follow the installation official guide
Checking to see if the tools is working correctly:
$ kubectl get pods --all-namespaces
NAMESPACE     NAME                                         READY   STATUS    RESTARTS   AGE
kube-system   calico-kube-controllers-795c4545c7-rbn9f     1/1     Running   0          17d
kube-system   calico-node-px4z5                            1/1     Running   0          17d
kube-system   calico-node-vf4n9                            1/1     Running   0          17d
kube-system   coredns-786ffb7797-6xwrc                     1/1     Running   0          17d
kube-system   coredns-786ffb7797-kcwrp                     1/1     Running   0          17d
kube-system   csi-cinder-controllerplugin-0                5/5     Running   0          17d
kube-system   csi-cinder-nodeplugin-5cncl                  2/2     Running   0          17d
kube-system   dashboard-metrics-scraper-6b4884c9d5-dlbxx   1/1     Running   0          17d
kube-system   k8s-keystone-auth-q8snh                      1/1     Running   0          17d
kube-system   kube-dns-autoscaler-75859754fd-fccg6         1/1     Running   0          17d
kube-system   kubernetes-dashboard-c98496485-gd4ks         1/1     Running   0          17d
kube-system   magnum-metrics-server-79556d6999-f9nxd       1/1     Running   0          17d
kube-system   npd-2zsdr                                    1/1     Running   0          17d
kube-system   openstack-cloud-controller-manager-v8ptf     1/1     Running   0          17d
Kubernetes Dashboard
The Kubernetes dashboard is enabled by default on clusters deployed on our platform.
In order to access the Kubernetes dashboard, you will need to retrieve the admin token for the cluster using the following command:
$ kubectl -n kube-system describe secret $(kubectl -n kube-system get secret | grep admin-token | awk '{print $1}')
$ kubectl proxy
Starting to serve on 127.0.0.1:8001
Monitoring Cluster
To enable monitoring on the cluster, we need to add a new label during deploy under Labels field.
monitoring_enabled=True
Disabling Selinux
By default selinux is enforced and there are cases where some services won't work due to selinux. During the deploy, we need to add a new label:
selinux_mode=disabled
Scaling Cluster
Scaling a cluster means adding servers to or removing servers from the cluster. Currently, this is done through the Resize operation.
Adding new new
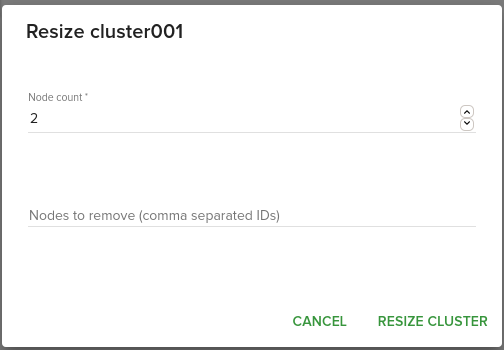
We increase the number of node count from the panel with the number of new nodes that we want to add into the cluster.
Removing a node
There are two ways of removing nodes from a cluster:
- decreasing the node count from the panel
- When some nodes are removed, Magnum will attempt to find nodes with no containers to remove. If some nodes with containers must be removed, Magnum will log a warning message.
- specifying the ID of the nodes that we specifically want to be removed, comma separated if we want to remove multiple servers.
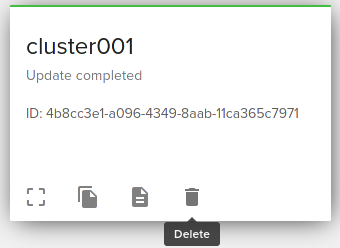
Upgrading cluster
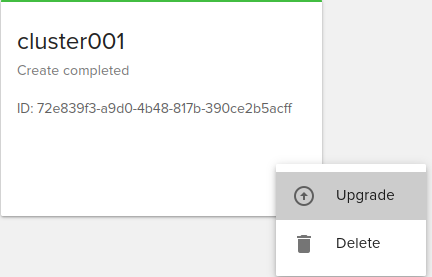
Rolling upgrade is an important feature a user may want for a managed Kubernetes service. To upgrade to a newer version of Kubernetes you will have to select a template that has a new version.
Note Downgrading is not supported.
Magnum tries to do the following:
- if the operating system doesn't change, kubernetes will be upgraded to the version specified in label kube_tag
- Fedora CoreOS supports operating system upgrade. Similar to the Kubernetes version upgrade, it will coordinate and drain the nodes before upgrading the operating system with rpm-ostree command. We set up in our templates the ostree_commit label. This is a commit ID of ostree the current system should be upgraded to.
Auto scaling
Default auto scaling is not enabled.
If you want to use this feature, please add the following label at cluster create:
auto_scaling_enabled=True
autoscaler_tag=v1.18.1
min_node_count=1
max_node_count=7
min_node_count: The minimum node count of the cluster when doing auto scaling or auto healing.
max_node_count: The maximum node count of the cluster when doing auto scaling or auto healing.
Debugging issues
Sometimes we need to ssh into the infrastructure nodes in order to debug issues. Ssh key is copied automatically into all the nodes from the cluster under core username. In our case, if we want to login our minion node:
$ ssh core@10.0.0.98
$ sudo -i
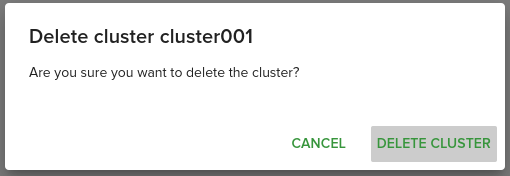
Deleting Cluster
If we deployed a bastion server, before deleting the cluster, we need to delete the bastion server first, otherwise, deleting the cluster fails.
Before deleting the cluster, make sure that you don't have any services left on production and all the data from volumes are saved locally,
Deleting the cluster is irreversible and cannot be restored.
Examples
Cinder CSI Storage Class
We enable by default out-of-tree Cinder CSI driver for all our templates.
To use this driver create the following YAML file StorageClass
Parameters:
- name: is the name of our class that we will use to create a PersistentVolumeClaim
- availability: currently we only have one zone and defaults is nova.
- type: we support only two volume types
- ssd: files are stored on ssd type of disk(fast)
- hdd: files are stored on hdd type of disk(slower)
apiVersion: storage.k8s.io/v1
kind: StorageClass
metadata:
  name: fast-storage
provisioner: cinder.csi.openstack.org
parameters:
  availability: nova
  type: ssd
$ kubectl create -f cinder-csi.yaml
Persistent Volume
Now that we have created our storage class, we can create a persistent volume.
kind: PersistentVolumeClaim
apiVersion: v1
metadata:
  name: mysql-volume
spec:
  storageClassName: "fast-storage"
  accessModes:
    - ReadWriteOnce
  resources:
    requests:
      storage: 20Gi
$ kubectl create -f volumes.yaml
Loadbalancer Integration
Load Balancer is supported through Octavia. For more information regarding Octavia-ingress-controller you can find at the following link
A configuration file might look like:
apiVersion: v1
kind: Service
metadata:
  name: example-service
spec:
  selector:
    app: example
  ports:
    - port: 8765
      targetPort: 9376
  type: LoadBalancer
You can alternatively create the service with the kubectl expose command and its --type=LoadBalancer flag:
$ kubectl expose rc example --port=8765 --target-port=9376 \
    --name=example-service --type=LoadBalancer
Cert-manager
If you plan to use cert-manager to generate Let's Encrypt certificates using ACME protocol, you will need to deploy your cluster using a different admission_control_list. From the default list, we need to remove PodSecurityPolicy.
admission_control_list="NodeRestriction,NamespaceLifecycle,LimitRanger,ServiceAccount,ResourceQuota,TaintNodesByCondition,Priority,DefaultTolerationSeconds,DefaultStorageClass,StorageObjectInUseProtection,PersistentVolumeClaimResize,MutatingAdmissionWebhook,ValidatingAdmissionWebhook,RuntimeClass"